How To Clean Sawdust Off Wood Before Staining
Pre-Staining Prep: A Step-by-Step Guide to Removing Sawdust from Wood Surfaces
Are you tired of using all those fake methods that end up wasting your time and money both? Wood is one of the most demanded materials on planet earth. It has played a significant role in the history of civilization, and its use and demand have been increasing with time. Now when we look around, we see this fibrous material from trees shaped into many different objects that we use daily.
The use of wood dates back to the arrival of humans on the earth. It has been in application in different forms in different ages. Some used it for making hunting tools, while others shaped it into furniture. But one thing that remained constant with time was its service to society.
Despite the replacement of many materials due to the takeover by plastic and metal as a result of technological advancement, the position of wood remained intact. Some of its most common uses are in construction, crafting, household items, and sports equipment, and their commercial uses are also highly noticeable.
How To Clean Sawdust Off Wood Before Staining?
In our homes, the extensive use of wood is blatantly visible in furniture. From bedroom sets and dining tables to sofa sets and bookshelves, we as a generation have a ton of wooden furniture stuffed into our houses. As this furniture takes up the responsibility of adding to our home’s beauty, it can also make them look utterly distasted if present in lousy condition.
A bad condition of furniture refers to the unpolished state it is sometimes found in or its unstained state. Some might think that furniture painting and furniture staining are two similar processes. But in reality, these are pretty different.
Staining is the process of permanently altering the appearance of wood while keeping the grain patterns of the wood visible, unlike paint hides the natural beauty of the wood. And painting, on the other hand, hides the natural components of the wood by covering it with a layer of paint.
How To Prep The Wood Before Staining?
If we talk about staining the wood, you must follow some steps. After selecting, you either want to go with a plant-based or oil-based stain. The next step would be prepping the wood. Preparing wood means cleaning the sawdust off the wood before staining it first. Sawdust is tiny particles of wood, mainly in powdered form, present on the wood after you cut the wood with a saw.
For cleaning the sawdust, you would need the following equipment:
Start by blowing off the heft of the sawdust and sanding buildup by utilizing an air compressor fitted with a blower nozzle. But it would be better if we vacuumed each surface and crevice of your object with a vacuum equipped with a decent-quality filter that would trap the tiny leftovers.
While any vacuuming is better than none, a vacuum cleaner with a standard filter will get the dust back into the room, where it can resettle on the wood surfaces. So you need to wipe off the wood surfaces now. For this purpose, a clean and dry cloth is required.
The use of wet cloth is not preferred because damp clothes are most likely to damage the wood and wooden furniture. Using white cloth will allow you to see how much dust has been cleared out or collected on the fabric.
Now comes the use of tack cloth, a piece of material woven loosely and has beeswax. The tack fabric is instrumental in eliminating the residue particles that the vacuum or material can’t stop. Therefore if you must essentially clean over the surface, it also prevents the stain from getting sludge. Just make the little bits of the tack fabric and begin cleaning the region. It is wiser to check the material intermittently to check how much residue is eliminated and change the cloth if it gets way too dirty.
Utilizing a tack cloth can also affirm that your wood surfaces have been appropriately sanded. Assuming you see that the delicate strings of the fabric are tearing through rough surfaces on the wood, it is an indication that you might not have finished enough with your sanding.
Assuming you look for an ideal completion, ensure the tack fabric wipes smoothly over the wood as you glide it, and if that does not happen, return to the previous sanding step and do it again to get the desired smooth surface.
The last step in prepping the wood is wiping the surface with a piece of cloth dampened with denatured alcohol. Alcohol is the best choice for this purpose because neither does it discolors the wood nor lets any particles stay. It clean wipes all the dust particles off the wood surface and evaporates quickly.
After finishing this process, you need to move on with your staining procedure as the dust will begin to resettle on the wooden surface within hours quickly. This mechanism is the standard procedure for prepping the wooden surface before painting or staining.
Post-Cleaning Procedure in Cleaning Sawdust Off Before Staining:
Once you’re done prepping, you have to open the pre-stain wood conditioner bottle and stir it using a stick. Even though this is an additional step but doing this favors the look in terms of finishing and smoothness. Start applying it in the direction of the grain. It will look like watery glue, but once it dries, it becomes transparent so let it sit nicely for a few minutes.
After this, wipe off the surface for any excess conditioner left on the wood with a clean towel, and since you have already decided which stain you are going for, now is the time you start staining. Avoid shaking the can or bottle of stain pre-application because that would build bubbles in the stain. Once these bubbles form in the liquid, they will transfer to your wood, too, thus leaving nasty-looking marks on the surface that will stay forever.
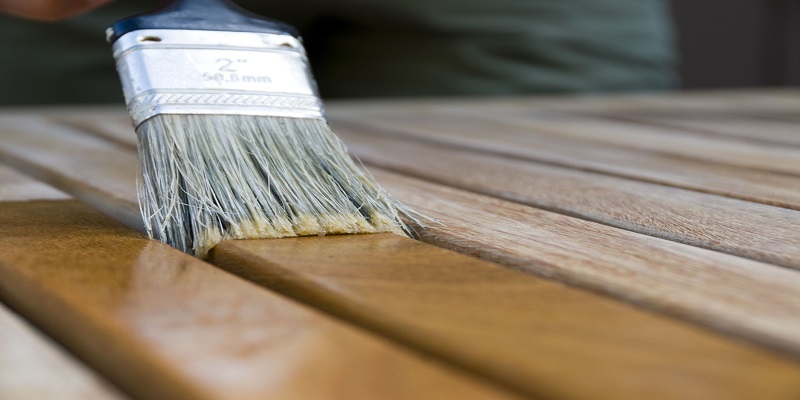
Utilizing a nice clean foam brush, apply an adequate measure of wood color to your surface. If your character has a visible amount of defined grain, you might need to use more color into the deeper grain or even apply the stain against it to get proper finishing.
Let it sit for a few minutes, and then use a clean cloth to wipe the surface off to remove the extra strain on the surface and let it dry again for a few hours. Drying the stain is that the more you let it dry, the darker it gets. After it has dried properly, go with another coat and then finish the staining with a coat of wax or polyacrylic.
After you are done with staining, let your brushes dry correctly, mainly if you use an oil-based stain.
How Often Should We Stain the Wood?
How often should we restain the wooden surfaces depending on certain factors such as the placement of your object, its exposure to sunlight, dust, and debris, and exposure to water? Another major factor depends on is how often you clean it or dust it before reapplying stains.
Manufacturers suggest giving the wood about 3-4 years before staining it again. Some think that before staining your wood again, you must let the older stain dry properly, which takes about 3-12 months; however, some suggest going for it without waiting as long as you are correctly prepping your surface each time before a new coat of stain.
But if you choose not to stain it anyways, the color of the wood will eventually fade away, making it dull and grey.
Conclusion:
Before working on anything, you need to prep it first, and prepping it means cleaning it beforehand so your task goes smoothly. Preparing the wood involves cleaning sawdust off of the wood before staining it, and there is a simple way of doing so. One would need an air blower or vacuum fitted with a blower’s nozzle and just blow all the dust off the surface. After that, you clean it with a clean towel or piece of cloth to remove the remaining dust particles that might have resettled on the surface after you vacuumed. This prepping makes the surface smooth enough for proper staining. If you want a clean and excellent finish on your wooden surfaces, you must consider prepping it beforehand. Without diligent prepping, your character remains rough and unfinished no matter how many coats of expensive stains you apply, Check out the More Best Tools from our Website.